Quick-Start
The Quick-Start guide explains how to, in few steps, get from an API to a functional Unreal Engine plugin.
1. Install the Code Generator
ApiGear provides two powerful tools: a Studio and a Command Line Interface (CLI). The Studio is a graphical tool for creating, editing API modules and projects, while the CLI is a command-line tool for generating code from API modules. Both offer comprehensive functionality, including SDK template management, API project creation, code generation, API monitoring, and API simulation.
Install ApiGear Studio
ApiGear Studio is available for macOS, Windows, and Linux. You can download it from the ApiGear Studio GitHub releases page.
For more detailed information on ApiGear Studio, refer to the dedicated studio documentation.
Install ApiGear CLI
The ApiGear CLI is a versatile command-line tool for generating code from API modules. It's available for macOS, Windows, and Linux. Download the latest version from the ApiGear CLI GitHub releases page.
The CLI offers all the features available in the Studio.
For more detailed information on the ApiGear CLI, consult the dedicated CLI documentation.
2. Obtain the Template
There are several methods to obtain the template: installation via the Studio, installation via the CLI, or cloning/downloading from GitHub.
The ApiGear Studio and the CLI detect the specified template in the solution document and install it automatically.
Optional steps (click to expand)
Installation via CLI
When using the CLI, only the highlighted line needs to be executed. You can verify the successful installation using the template cache command.
- Unreal Engine
- C++14
- Qt6
- Python
$ apigear template install apigear-io/template-unreal@v3.2.2
$ apigear template cache
list of templates from the local cache

source                            | url                                               | installed | latest
apigear-io/template-unreal@v3.2.2 | https://github.com/apigear-io/template-unreal.git | <sha1>    | v3.2.2
...
$ apigear template install apigear-io/template-cpp14@v3.6.0
$ apigear template cache
list of templates from the local cache

source                            | url                                               | installed | latest
apigear-io/template-cpp14@v3.6.0  | https://github.com/apigear-io/template-cpp14.git  | <sha1>    | v3.6.0
...
$ apigear template install apigear-io/template-qtcpp@v0.4.0
$ apigear template cache
list of templates from the local cache

source                            | url                                               | installed | latest
apigear-io/template-qtcpp@v0.4.0  | https://github.com/apigear-io/template-qtcpp.git  | <sha1>    | v0.4.0
...
$ apigear template install apigear-io/template-python@v1.0.0
$ apigear template cache
list of templates from the local cache

source                            | url                                               | installed | latest
apigear-io/template-python@v1.0.0 | https://github.com/apigear-io/template-python.git | <sha1>    | v1.0.0
...
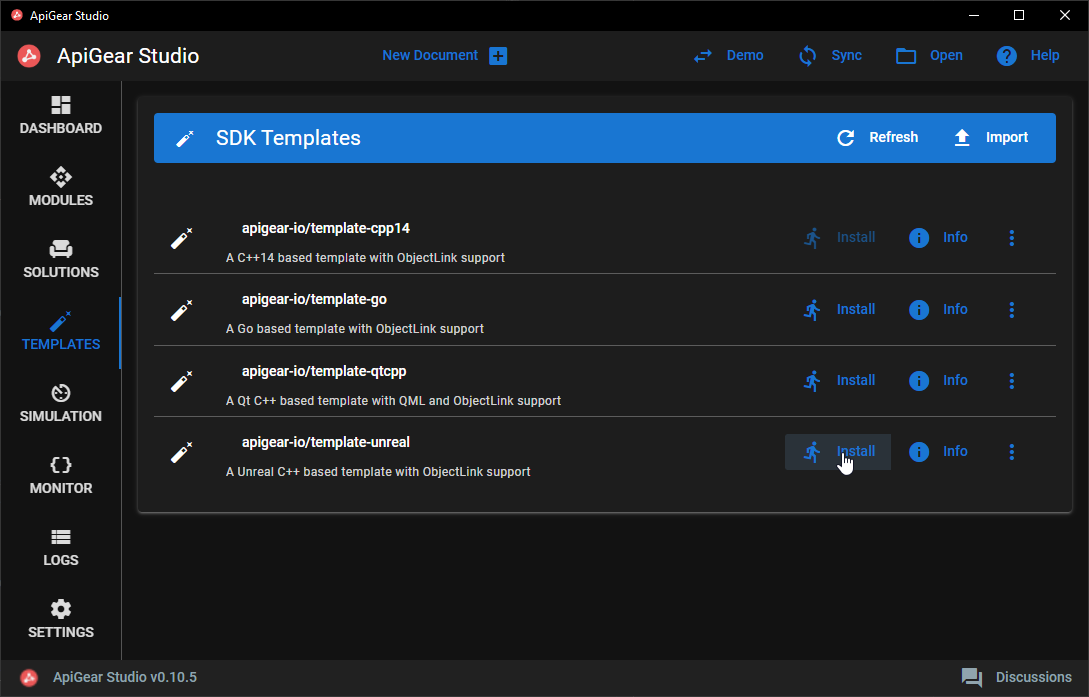
Installation via Studio
Installing the template through the Studio is straightforward:
- Unreal Engine
- C++14
- Qt6
- Python
- Open an existing project or create a new one
- Navigate to the
Templatestab - Click
Installon theapigear-io/template-unrealentry
- Open an existing project or create a new one
- Navigate to the
Templatestab - Click
Installon theapigear-io/template-cpp14entry
- Open an existing project or create a new one
- Navigate to the
Templatestab - Click
Installon theapigear-io/template-qtcppentry
- Open an existing project or create a new one
- Navigate to the
Templatestab - Click
Installon theapigear-io/template-pythonentry
Cloning from GitHub
If you need to inspect or modify the template's source code, cloning or downloading the repository is recommended. The repository doesn't need to be part of your project and can be stored anywhere on your computer.
- Unreal Engine
- C++14
- Qt6
- Python
$ git clone https://github.com/apigear-io/template-unreal.git
$ git clone https://github.com/apigear-io/template-cpp14.git
$ git clone https://github.com/apigear-io/template-qtcpp.git
$ git clone https://github.com/apigear-io/template-python.git
You can then configure the solution file to use your template by providing the relative path from the solution file to the template directory.
3. Set Up the Project
A typical project requires two files: a solution file specifying the APIs and the template to use, and at least one API module file. Ideally, both should be placed in a folder named apigear, adjacent to each other.
Alternatively, you can use the Studio to create a new project and modify the two example files provided.
Solution File
Create a solution file. The example below specifies:
- Module files in line 8, here the
helloworld.module.yamlmodule with theHelloAPI - The output directory for generated files in line 9
- The template used to generate the code in line 10 (this can also be a path to a local copy of the template)
- The enabled features of the template in line 13, here the
stubsfeature, which provides a simple implementation of interfaces.
- Unreal Engine
- C++14
- Qt6
- Python
schema: "apigear.solution/1.0"
name: hello_world_example
version: "0.1.0"

targets:
  - name: ue_docs
    inputs:
      - helloworld.module.yaml
    output: ../ue_docs
    template: apigear-io/template-unreal@v3.2.2
    force: true
    features:
      - stubs
schema: "apigear.solution/1.0"
name: hello_world_example
version: "0.1.0"

targets:
  - name: cpp_hello_world
    inputs:
      - helloworld.module.yaml
    output: ../cpp_hello_world
    template: apigear-io/template-cpp14@v3.6.0
    force: true
    features:
      - stubs
schema: "apigear.solution/1.0"
name: hello_world_example
version: "0.1.0"

targets:
  - name: qt_hello_world
    inputs:
      - helloworld.module.yaml
    output: ../qt_hello_world
    template: apigear-io/template-qtcpp@v0.4.0
    force: true
    features:
      - stubs
schema: "apigear.solution/1.0"
name: hello_world_example
version: "0.1.0"

targets:
  - name: hello_world
    inputs:
      - helloworld.module.yaml
    output: ../py_hello_world
    template: apigear-io/template-python@v1.0.0
    force: true
    features:
      - stubs
You can extend this solution file with additional targets, each for a different technology with a different template. The module.yaml file is technology-independent and can be used with any template.
We highly recommend specifying the exact version of the template. Otherwise, a newer version will be automatically downloaded and used for code generation. This can lead to unexpected behavior if file structures or code changes in the template.
Set the force parameter to true if you want to always override all generated files. When set to false, some files, such as implementations (stub feature), won't be updated. API files are always updated regardless of this setting.
API Module File
Use your preferred text editor to create the helloworld.module.yaml file with the following example content:
schema: apigear.module/1.0
name: io.world
version: "1.0.0"

interfaces:
  - name: Hello
    properties:
      - { name: last, type: Message }
    operations:
      - name: say
        params:
          - { name: msg, type: Message }
          - { name: when, type: When }
        return:
          type: int
    signals:
      - name: justSaid
        params:
          - { name: msg, type: Message }
enums:
  - name: When
    members:
      - { name: Now, value: 0 }
      - { name: Soon, value: 1 }
      - { name: Never, value: 2 }
structs:
  - name: Message
    fields:
      - { name: content, type: string }
4. Generate Code
Generate via CLI
The following snippet demonstrates how to run the CLI and provides an example output:
$ apigear generate solution apigear/helloworld.solution.yaml
10:52:20 INF generated 21 files in 30ms. (20 write, 0 skip, 1 copy) topic=gen
- The
generatecommand instructs the CLI to generate code - The
solutionparameter specifies that we want to process a solution file
Generate via Studio
- Open the project
- Navigate to the
Solutionstab - Click
Runon thehelloworld.solution.yamlentry

5. How to use the plugin
Project folder structure
For the code generation we assume that both ApiGear files reside in an apigear subfolder next to the Unreal Engine project.
In this case the folder structure should look similar to this.
📦ue_docs_example_project
 ┣ 📂apigear
 ┃ ┣ 📜helloworld.solution.yaml
 ┃ ┗ 📜helloworld.module.yaml
 ┣ 📂ue_docs
 ┃ ┣ 📂Config
 ┃ ┣ 📂Content
 ┃ ┣ 📂Platforms
 ┃ ┣ 📂Plugins
 ┃ ┣ 📂Source
 ┃ ┗ 📜ue_docs.uproject
Using the solution file from the previous paragraph the code will be generated in the ue_docs/Plugins folder.
output: pathThe generator writes each module's plugin folder directly under output: — it does not append Plugins/ for you. To land plugins under your Unreal project's Plugins/ directory, set output: ../ue_docs/Plugins in your solution.yaml. The path you give is the parent of the generated plugin folders (e.g. IoWorld/, ApiGear/).
This guide assumes you already have an Unreal Engine project. The generated plugin will be placed in your project's Plugins folder.
The generated code can be used with Blueprints and C++. Make sure to have the generated plugin code in your projects plugins directory as noted in the previous section.
Hosting the plugin in a fresh UE project
If you don't have an existing Unreal project (for example, in a CI pipeline or when starting from a clean workspace), the four files below are the minimum needed to host a generated plugin. The example uses the IoWorld plugin produced from io.world.Hello and references it from a host module called HelloHost.
Drop these files next to the Plugins/ directory you generated into:
📦HelloHost
 ┣ 📂Plugins
 ┃ ┣ 📂ApiGear
 ┃ ┗ 📂IoWorld
 ┣ 📂Source
 ┃ ┣ 📂HelloHost
 ┃ ┃ ┗ 📜HelloHost.Build.cs
 ┃ ┣ 📜HelloHost.Target.cs
 ┃ ┗ 📜HelloHostEditor.Target.cs
 ┗ 📜HelloHost.uproject
HelloHost.uproject
{
    "FileVersion": 3,
    "EngineAssociation": "5.7",
    "Category": "",
    "Description": "ApiGear MQTT5 helloworld host project",
    "Modules": [
        {
            "Name": "HelloHost",
            "Type": "Runtime",
            "LoadingPhase": "Default",
            "AdditionalDependencies": [
                "Engine",
                "IoWorldAPI",
                "IoWorldCore",
                "IoWorldImplementation",
                "IoWorldMQTT",
                "ApiGear",
                "ApiGearMQTT",
                "ApiGearMQTTPaho"
            ]
        }
    ],
    "Plugins": [
        { "Name": "ApiGear", "Enabled": true },
        { "Name": "IoWorld", "Enabled": true }
    ]
}
Source/HelloHost.Target.cs
using UnrealBuildTool;

public class HelloHostTarget : TargetRules
{
    public HelloHostTarget(TargetInfo Target) : base(Target)
    {
        Type = TargetType.Game;
        DefaultBuildSettings = BuildSettingsVersion.V6;
        IncludeOrderVersion = EngineIncludeOrderVersion.Unreal5_7;
        ExtraModuleNames.Add("HelloHost");
    }
}
Source/HelloHostEditor.Target.cs
using UnrealBuildTool;

public class HelloHostEditorTarget : TargetRules
{
    public HelloHostEditorTarget(TargetInfo Target) : base(Target)
    {
        Type = TargetType.Editor;
        DefaultBuildSettings = BuildSettingsVersion.V6;
        IncludeOrderVersion = EngineIncludeOrderVersion.Unreal5_7;
        ExtraModuleNames.Add("HelloHost");
    }
}
Source/HelloHost/HelloHost.Build.cs
The dependency list is the non-obvious bit. IoWorldAPI / IoWorldCore / IoWorldImplementation are always needed; add IoWorldMQTT, ApiGearMQTT, and ApiGearMQTTPaho only if you generated the mqtt feature. Swap in IoWorldOLink / ApiGearOLink for OLink, or IoWorldMsgBus for Message Bus.
using UnrealBuildTool;

public class HelloHost : ModuleRules
{
    public HelloHost(ReadOnlyTargetRules Target) : base(Target)
    {
        PCHUsage = PCHUsageMode.UseExplicitOrSharedPCHs;
        IWYUSupport = IWYUSupport.Full;

        PublicDependencyModuleNames.AddRange(new string[]
        {
            "Core",
            "CoreUObject",
            "Engine",
            "IoWorldAPI",
            "IoWorldCore",
            "IoWorldImplementation",
            "IoWorldMQTT",
            "ApiGear",
            "ApiGearMQTT",
            "ApiGearMQTTPaho",
            "JsonUtilities",
            "Projects"
        });

        PrivateDependencyModuleNames.AddRange(new string[] { });
    }
}
You also need a minimal module entry point — two short files next to HelloHost.Build.cs:
#pragma once

#include "CoreMinimal.h"
#include "HelloHost.h"
#include "Modules/ModuleManager.h"

IMPLEMENT_PRIMARY_GAME_MODULE(FDefaultGameModuleImpl, HelloHost, "HelloHost");
After dropping these files in place, right-click the .uproject and choose Generate Visual Studio project files (or run UnrealBuildTool's -projectfiles command), then build the editor target. The generated plugins compile alongside your host module.
Verify Plugin Installation
After generating the code:
- Open your Unreal project in the Editor
- Go to Edit → Plugins
- Search for
IoWorld- you should see the generated plugin listed - Ensure the plugin is enabled (checkbox checked)
- Restart the Editor if prompted
If the plugin does not appear, verify the generated files are in the correct Plugins folder and regenerate project files.
Using the Interface
- Blueprint
- C++
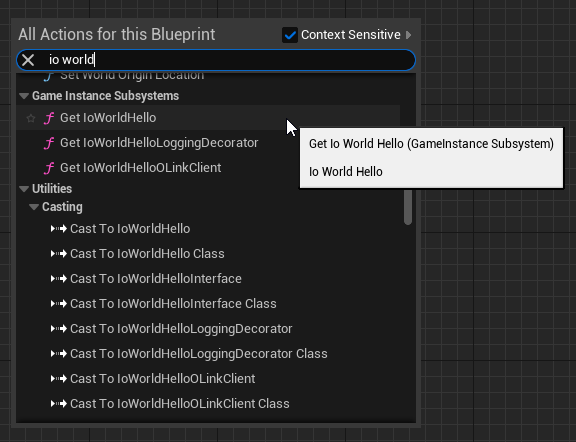
Getting the Subsystem
Open your project in the Unreal Editor and choose a Blueprint where you want to use the interface.
First, get the GameInstance subsystem of the type IoWorldHelloImplementation:
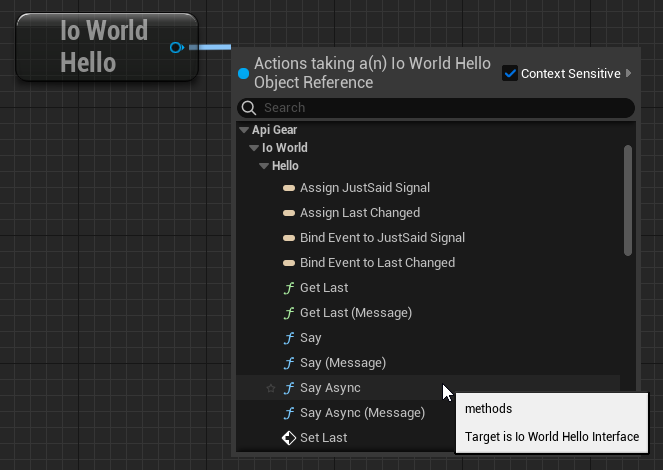
Calling Operations
On this subsystem we can choose the asynchronous Say function. Using the async version prevents blocking the game thread:
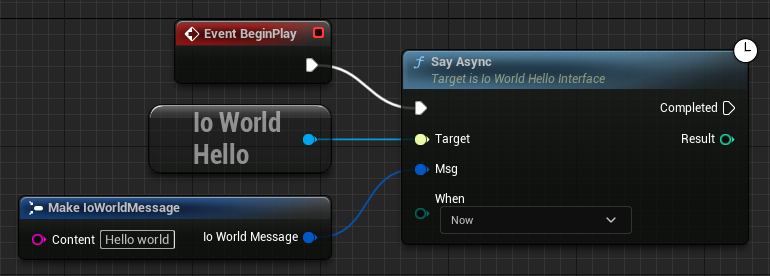
Complete Example
The complete setup to say "Hello world" on begin play:
Module Dependencies
For any C++ module to access the generated interface, add the dependency in your .Build.cs file. The module name is a PascalCase transformation of the ApiGear module name (io.world becomes IoWorld):
PrivateDependencyModuleNames.AddRange(new string[] { "IoWorldAPI", "IoWorldImplementation" });
After modifying your .Build.cs file, regenerate your project files and rebuild the project. In Visual Studio, this is typically done via Build → Rebuild Solution.
Include Headers
The generated plugin provides three key headers:
- IoWorldHello.h - The implementation class (GameInstance subsystem)
- IoWorld_data.h - Data types: structs (
FIoWorldMessage) and enums (EIoWorldWhen) - IoWorldHelloInterface.h - The interface definition (
IIoWorldHelloInterface)
For most use cases, include all three:
#include "IoWorld/Implementation/IoWorldHello.h"
#include "IoWorld/Generated/api/IoWorld_data.h"
#include "IoWorld/Generated/api/IoWorldHelloInterface.h"
Calling Operations
Get the implementation through the GameInstance subsystem. The TScriptInterface wrapper provides polymorphic access to the interface while holding a reference to the concrete implementation.
Enum values use a prefix derived from the module and enum name. For the When enum in io.world, the prefix is IWW_ (IoWorld When), giving values like IWW_Now, IWW_Soon, and IWW_Never.
#include "ue_docsGameModeBase.h"
#include "IoWorld/Implementation/IoWorldHello.h"
#include "IoWorld/Generated/api/IoWorld_data.h"
#include "IoWorld/Generated/api/IoWorldHelloInterface.h"

void Aue_docsGameModeBase::InitGame(const FString& MapName, const FString& Options, FString& ErrorMessage)
{
    Super::InitGame(MapName, Options, ErrorMessage);

    TScriptInterface<IIoWorldHelloInterface> Hello =
        GetGameInstance()->GetSubsystem<UIoWorldHelloImplementation>();

    FIoWorldMessage MyMsg;
    MyMsg.content = FString("Hello world");
    Hello->Say(MyMsg, EIoWorldWhen::IWW_Now);
}
Async Operations (Recommended)
Operations with return values have async variants that prevent blocking the game thread. This is especially important when using network backends (OLink, MsgBus) where operations involve network latency. The async call returns immediately with a TFuture that resolves when the operation completes.
TFuture<int32> Future = Hello->SayAsync(MyMsg, EIoWorldWhen::IWW_Now);

Future.Next([](const int32& Result) {
    UE_LOG(LogTemp, Log, TEXT("Say returned: %d"), Result);
});
Subscribing to Events
- Blueprint
- C++
To react to property changes or signals in Blueprints:
- Get the subsystem as shown above
- Call Get Publisher on the subsystem
- From the Publisher, drag off and search for Assign to find bindable events
- Choose the event you want: On Last Changed BP (property change) or On Just Said Signal BP (signal)
The Publisher object holds all delegates because Unreal interfaces cannot declare delegates directly.
Blueprint screenshots for event binding coming soon.
To receive property change and signal notifications, bind to delegates on the Publisher object. Callback methods must be marked with UFUNCTION() for dynamic delegate binding to work.
Delegate names follow these patterns:
- Property changes:
On{PropertyName}ChangedBP(e.g.,OnLastChangedBP) - Signals:
On{SignalName}SignalBP(e.g.,OnJustSaidSignalBP)
In your class header, declare the callback functions:
UFUNCTION()
void OnLastChanged(const FIoWorldMessage& Last);

UFUNCTION()
void OnJustSaid(const FIoWorldMessage& Msg);
In your implementation, bind to the events:
Hello->_GetPublisher()->OnLastChangedBP.AddDynamic(this, &UMyClass::OnLastChanged);
Hello->_GetPublisher()->OnJustSaidSignalBP.AddDynamic(this, &UMyClass::OnJustSaid);
Always remove delegate bindings when your object is destroyed. Failing to do so can cause crashes when the event fires after your object is gone:
Hello->_GetPublisher()->OnLastChangedBP.RemoveDynamic(this, &UMyClass::OnLastChanged);